Question 1

Louis Jacques Mandé Daguerre
The inventor of the daguerreotype process
I chose to write about the daguerreotype process because I think the process is very interesting, fascinating and complicated.
The daguerreotype process was in my opinion the most important and revolutionary discovery in photographic history. Not only did Louis Daguerre come up with a process that could take life-like images, he also let the French government take over the rights so that the method could be used by everyone. But the way to success wasn’t so quick and easy for Daguerre.
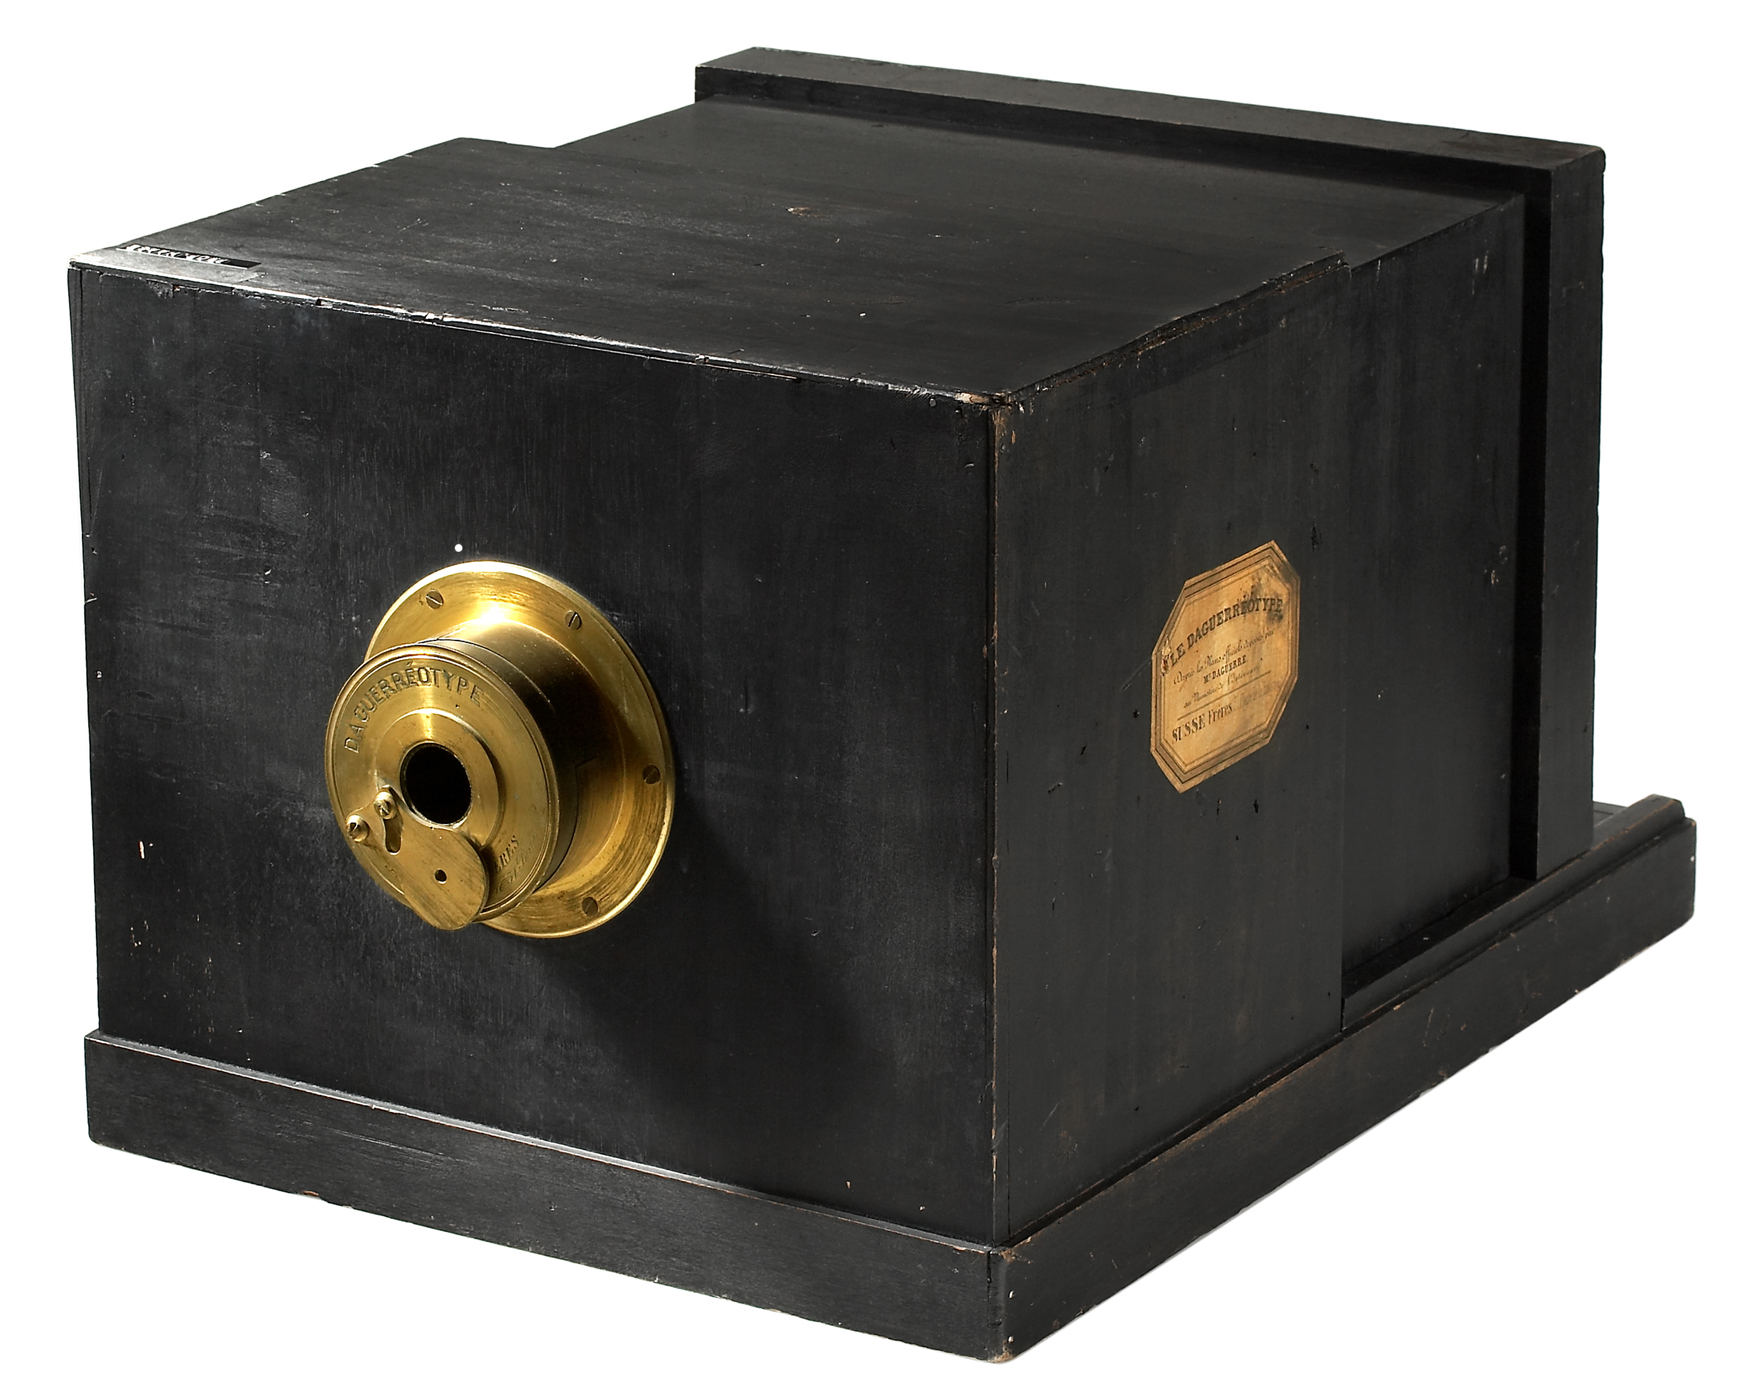
Louis Daguerre first collaborated with another Frenchman named Joseph Niepce, who was the first to capture an image of nature with a camera. Louis and Joseph shared ideas and did research together on photography, but in 1833 Joseph suddenly died and Louis had to continue with the experiments on his own. Through his research and experimenting, Louis discovered that a silver plate treated with iodine, which then was exposed to light resulted in a lasting image after the plate was developed using mercury and then fixed with a salted water solution. As you can tell, this was a long and complicated method. He tried to find private investors for his work but no one was interested, and he had economic struggles due to many years of testing and researching. But, in 1839 he approached the French Academy of Sciences about his invention and soon the French government took over the rights to make the method available for everyone.

Here is the daguerreotype process step by step:
1. Start buffing the silver-coated copper plate for a few minutes to achieve a mirrored surface.
2. To make the plate sensitive to light; place the plate face down in a box filled with iodine and then bromide.
3. Remove the plate from the box and blow away any dust that is on the plate.
4. Place the plate in a wooden holder and place it into the camera.
5. Remove the lens cap to let light in. The exposure time can vary from 5-60 seconds. During the exposure time, the subject must sit completely still to avoid blurriness in the photograph.
6. Put the lens cap back on the camera lens to stop the exposure time.
7. Take out the wooden holder containing the silver plate.
8. Expose the silver plate to mercury fumes, to start the developing process.
9. Remove the developed plate from the box, and fix it with a salt-water solution. This stops the image from reacting to daylight.
10. Rinse the plate with distilled water to remove the fixing solution.
One of the downsides of daguerreotypes was that you only got one image and no other copies like you would with for example negatives. But, I actually think that this makes daguerreotype even more unique as the image you get is the only one in the whole world. However, there was one way to get more copies of the same image, and that was simply just to have two or more cameras pointing at the same photo object/subject, but it was very expensive. Of course, today you can digitize the original making endless of copies, but that wasn’t the case back in the 1800s.
Today, there are only a handful of people who creates daguerreotypes. The reason for this is because it is such a long process including chemicals that should only be handled by people who have the proper training and safety protocols. In this video from Victoria and Albert Museum, you can see how Dr Mike Robinson creates a portrait using his own version of the daguerreotype:
https://youtube.com/watch?v=DAPgdo5H7ZY%3Fautoplay%3D0%26mute%3D0%26controls%3D0%26origin%3Dhttps%253A%252F%252Fmanage.wix.com%26playsinline%3D1%26showinfo%3D0%26rel%3D0%26iv_load_policy%3D3%26modestbranding%3D1%26widget_referrer%3Dhttps%253A%252F%252Feditor.wix.com%252F%26enablejsapi%3D1%26widgetid%3D1
Question 2
Name all the functions / buttons on the front of your camera

Name all the functions / buttons on the back of your camera

Explain how you would set the correct ISO
To set the correct ISO, I would press the information edit button, use the arrows on the multi selector and select the ISO-sensitivity. Press OK, and select the desired ISO-sensitivity.
Explain how you would change the aperture
To change the aperture, I would first turn the mode dial to mode “A” (Aperture-Priority Auto). Then, I change the aperture by rotating the command dial. The aperture is shown both in the viewfinder and the monitor.
Explain how you would change the shutter speed
To change the shutter speed, I would first turn the mode dial to mode “S” (Shutter-Priority Auto). After that, I can change the shutter speed by rotating the command dial. The shutter speed is shown both in the viewfinder and the monitor.
Sources:
https://www.metmuseum.org/toah/hd/dagu/hd_dagu.htm
https://www.aps.org/publications/apsnews/201301/physicshistory.cfm
Image Sources:
https://upload.wikimedia.org/wikipedia/commons/2/2e/Louis_Daguerre_2.jpg
https://upload.wikimedia.org/wikipedia/commons/5/57/Susse_Fr%C3%A9re_Daguerreotype_camera_1839.jpg

